New Look
Registerd User
Enjoyed the heck doing this project. Repeat customer and they call me up every year when the Yankees are in town to play the A's. [spin]

Very nice Carlos. Can you explain the steps involved in that pool deck? If you would like to share?
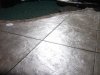
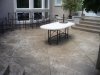
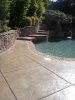
Sure Chris....pretty straight forward as the stamped concrete was in excellent shape, meaning that the colors were still rich. Normally I surface clean but as mentioned the concrete and the colors were excellent. I opted to wand around the pool. Prior to that I xjetted a weak chem mix...let the dwell do it's thing. Bumped the burner up to about 150 degrees and rinsed. One thing to point out is that you need to be careful that you don't rinse/wash the water into the pool. I usually begin at water edge and rinse away from the pool water as much as possible. It is always good to FYI the customer that there is a good possibility that some "rinse water" will get in the pool water. I always ask customer to keep their pool pump running when we are washing.
After washing, you let the concrete dry. Once it is dry or close to it....SEAL AWAY. This particular job was a high gloss (Super Wet) look. I applied 2 coats. First coat was a heavy one where after we spray the sealant on we then go over it with a shop broom so that the sealant has a consistent and even appearance to it. Careful with puddling of the sealant in the stamp indentations on the concrete. Broom over those again if needed. Once the first coat is dry we went over it a second time with a lighter coat. This particular job involved all the stamped concrete around the pool, outdoor living spaces, 2 barbeque areas, sitting area, all sidewalks, front door entrance way and of course the driveway and stamped bands around the driveway. Started sealing around 10 and finished up around 2'ish!
Excellent Job Carlos, looks great. I am trying to make arrangements for the June 24th Seal n Lock training. We'll see.
")
Thanks for the detailed explanation.
Carlos, what brand of sealer are you useing?
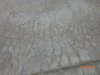
Take a look at this pic. would I need to strip all the old sealer before reappling new sealer? Or a simple clean and reapply?
wow carlos, thats some nice work there. so total your looking at a "whole day" job. 6hrs or so total, for clean and seal. But looks great and keeps them coming back.